Introduction to WebGME
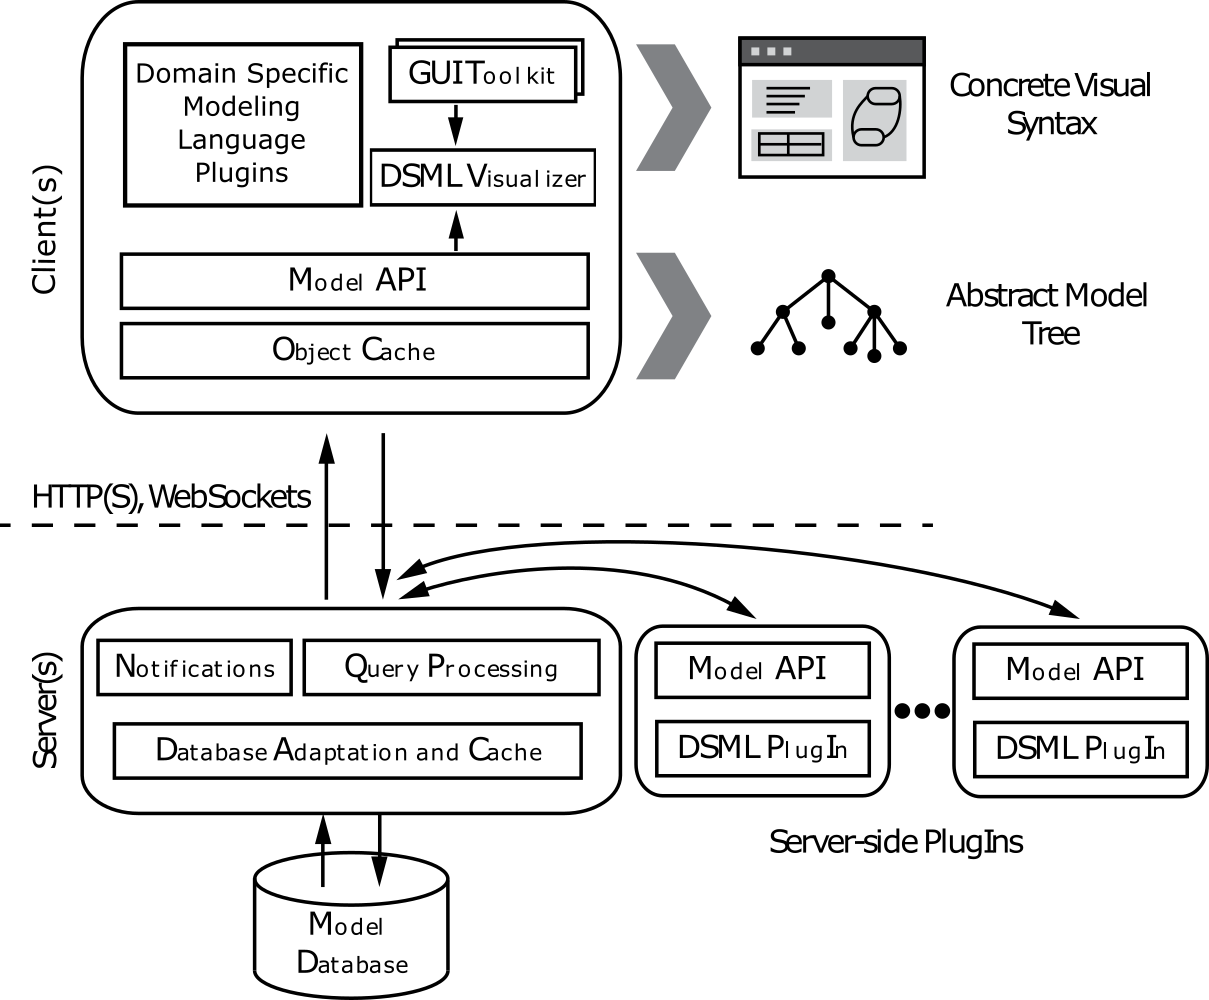
This post gives an overview of what WebGME is and how to use it. WebGME is an online, collaborative, versioned model-based design tool for creating (meta-)models for any type of system. It provides the means for users to develop meta-models and models (followingthe rules of one or more meta-models) in an environment which provides git-like versioning, branching, and merging simultaneously with multiple users. Users can customize the decoration, visualization, and interaction with the entities in the models and can write plugins which can be invoked by the user to operate on the model and possibly transform the model into artifacts.
WebGME Usage
WebGME provides the base of the user-interface front-end, as well as the model storage, versioning, and management infrastructure which allows the creation and invocation of plugins which act on parts of the created models.
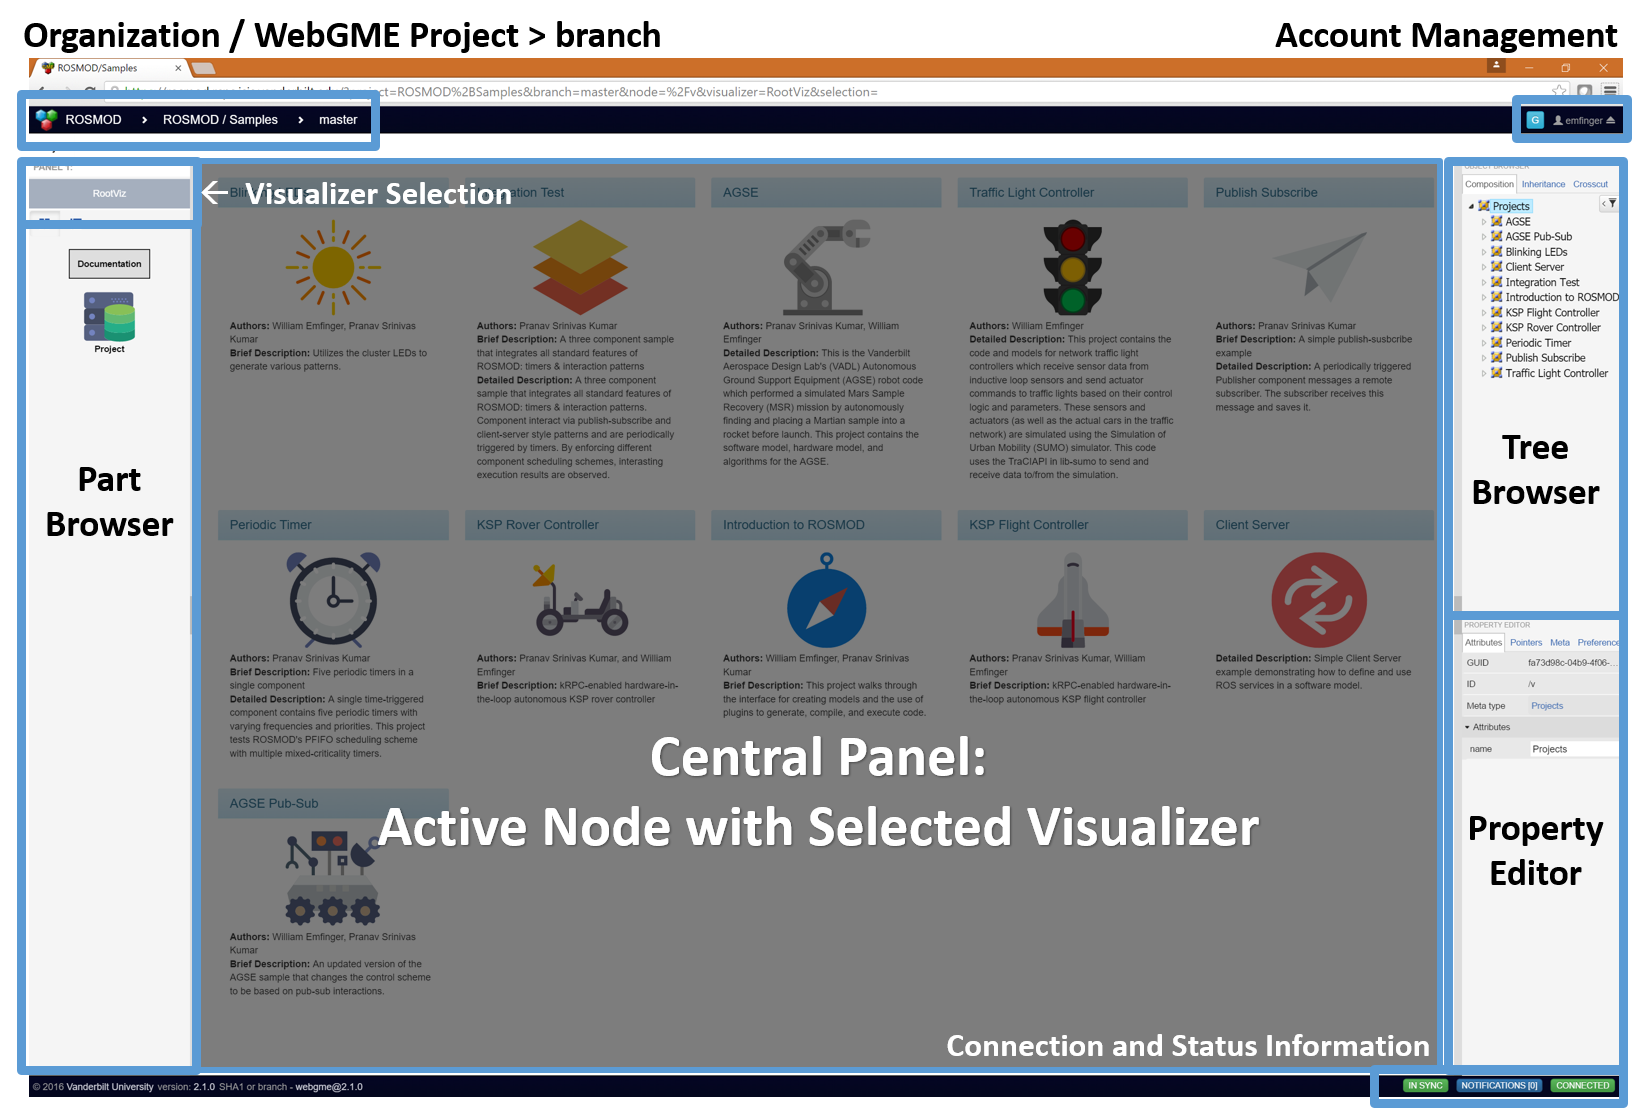
The main view aspect of WebGME modeling is split into three panels,
arranged horizontally with each other into left, center, and right
panels. The center panel is the main view for the currently selected
model object; and the left and right panels can be optionally hidden
by using the mouse and dragging/clicking their hide function or by
using ctrl+right (to toggle the display of the right panel) or
ctrl+left (to toggle the display of the left panel).
Visualizer Selection and Part Browser
The left panel is composed of two sub-panels (arranged vertically):
the Visualizer Selection panel and the Part Browser panel. The
Visualizer Selection panel allows the user to select between the
available visualizations of the currently selected model object. This
visualization affects the content and interaction of the center
portion of the UI. The Part Browser panel displays the object types
which can be created as children of the currently selected model
object. Creation of objects can be achieved by dragging from the
Part Browser panel into the center panel.
Active Object Visualization
The center panel displays selected visualization of the currently
selected model object. The default visualization displays the
children of the currently selected model object, and allows
drag-and-drop from the Part Browser or Tree Browser into the
center panel for creation (from part browser) or move/instance/copy
(from the tree browser).
Tree Browser and Attribute Editor
The right panel is composed of two sub-panels (arranged vertically):
the Tree Browser panel and the Attribute Editor panel. The Tree
Browser panel allows the navigation of all the projects in the
current model and all of their children objects in a tree. It also
supports group selection, movement, copying, deletion, and drag/drop
to other panels (for instance the Attribute Editor or the center
panel). The Attribute Editor panel allows the editing of the
currently selected model object’s Attributes and Pointers. Since
pointers are references to other model objects, the user can drag an
object from the Tree Browser onto a pointer of the selected model
object to set that pointer. Note that the drop action will check to
ensure that the object to which the pointer is being set belongs to
the types of objects that are valid for that pointer to point to. If
the object is of the correct type, the pointer will be set and it will
show green while hovering over it; otherwise the pointer will show red
and will not update the value.
Constraints
In the upper left of the UI, WebGME provides the utility to check the
constraints defined in the meta. These constraints can be checked
for just the currently selected model object, the selected model
object and all its children, or the whole project. Upon completion it
returns a form which specifies any constraints (e.g. containment
cardinality) that have been violated and provides links to the
offending objects.
Plugins
Finally, WebGME provides the infrastructure for executing Plugins,
which can create, edit, or delete model objects in addition to
creating and returning artifacts based on the model. Additionally,
these plugins can spawn off other tasks (e.g. compilation).
Plugins can run on either the server or within the client browser, though not all plugins support execution on both of these platforms. When executing the plugin, the user will be presented with a dialog to specify the configuration of the plugin which may contain many fields of different types and may even ask the user to upload a file of a specific type (depending on the purpose of the plugin).
When the plugin has been configured and the user starts it, it begins execution and the user is free to continue interacting with and possibly editing the model.
While the plugin is executing, it may produce notifications (view-able
in the bottom right) as a list that is clear-able; each notification
received shows as a popup temporarily but is also saved into the list.
The list is view-able by clicking on the Notifications button.
When the plugin completes (possibly terminating due to an error), the user is notified and may view the results of the plugin. The results are presented as messages and optionally some downloadable artifacts. Note that a plugin may have also altered the model (adding, removing, or editing).